Hey, I’m DogChomp and Morse asked me to help make a tutorial and gather the materials you all will need to get started! (I stole his title for this post, by the way. Thank goodness for all of you creative writers.)
Now, don’t fret if you don’t want to do this at home, we can do this at camp together, but if you want to practice or get a leg up on your fellow campers, this tutorial is the place for you!
Morse brings to my attention the length of this project.
Designing the image you want on your stamp is probably going to be the longest part. I have sketch books that are full of ideas, some of which have worked, and others have not. It helps to have a sketch book or scraps of paper lying around in case you don’t want to work at a computer. You can roughly estimate how large you’d like your stamp and sketch from there. For me, creating a solid design from start to ready as heck to carve is about 45 to an hour. So if you want to do this at camp, Morse and I suggested bringing a design you already had in mind. Morse would like to supply rubbers for carving, maximum size would be 2 inch by 2 inch squares, so keep that in mind for when you plan your design!
After you’ve got your design, carving typically takes me about 30 to 45 minutes. It really depends on the complexity of your design and, of course, your confidence and skill level.
First, you’re going to want to get some materials:

This is all the stuff I personally like to start with:
Pink Speedball Brand rubber, you can pick it up at any Dick Blick store!
The Blick lino cutting hand tool, that’s about $5 to $7 at Dick Blick, you can get a more expensive one, but if you’re just starting out, I’d recommend this one!
an X-acto Knife, $3. I picked mine up at a Kroger store.
E6000, $5 at Home Depot, you’ll only want this if you plan on mounting your stamp to a wooden block!
And the wood block I picked up at Home Depot in their trash, living up to that trash dog title. But seriously! Don’t go out and buy wood unless you’re looking for a very specific quality. You can go to the lumber department, find their saw blade and there’s usually a trash can with scraps inside. You can get these scraps for free because they’re cuts of wood that are in the trash!!! I just cut mine down to 2x2 inch squares and sanded the edges.
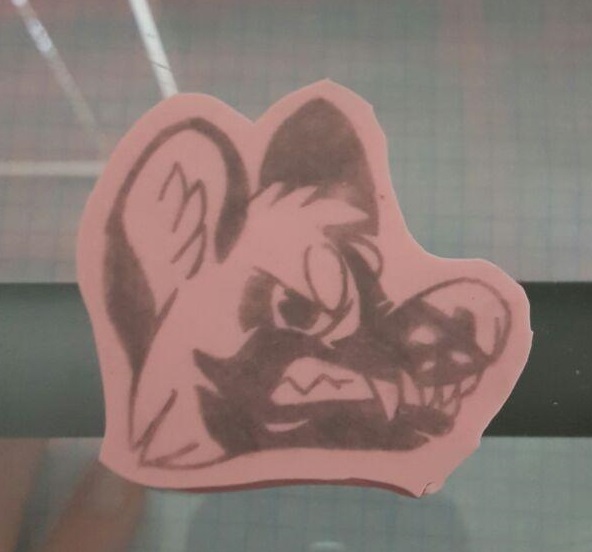
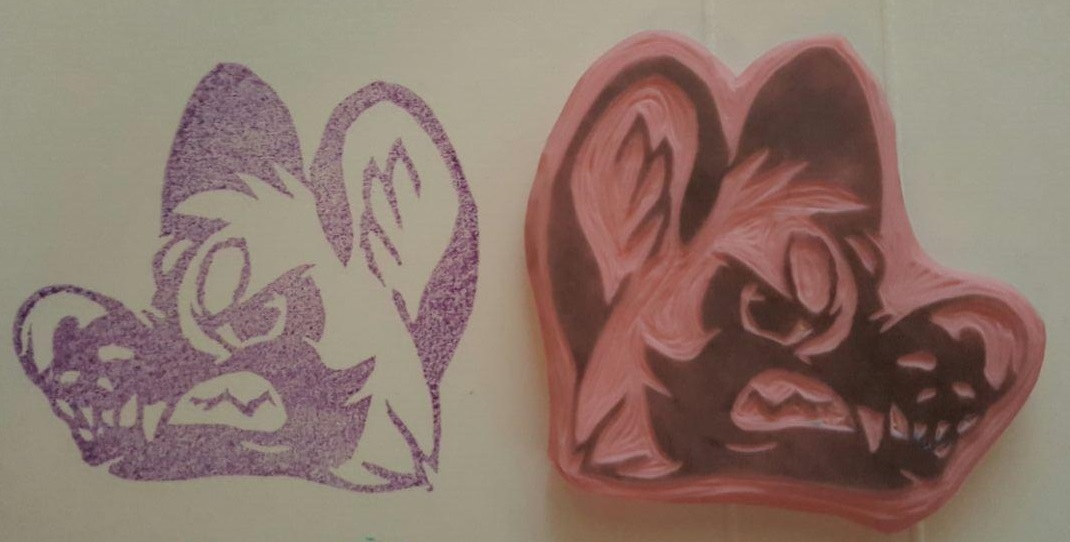
Finally, my design! I wanted to make a logo for the things that I sell as well as a water mark, so your stamp can absolutely be multi-purpose!

I do all of my designing on the computer, which may not be feasible for everyone. I like to use this digital element because it allows me to easily scale an image, as well as fine tune details. At a larger scale, some details come out better than others, and scaling an imagine really helps me to determine what I know i can successfully carve into a stamp and what I can’t. All of my stamps are typically 2 inches by 2 inches and are rounded out during the carving process, I’ll show you what I mean in a few steps.

Now you’re going to want to trace (or draw) your image onto a scrap piece of paper. I use a cm grid paper so i can suss out about what 2 inches is going to look like before i even trace my design onto it. (That picture is horrible, I know, but it illustrates what I need it to!)
To trace or draw my design, I prefer to use a mechanical pencil just because it has a consistent point that I can manipulate so my lines are sure and I can make precise marks with it. You can also use a frequently sharpened pencil. Graphite, in my experience, is the best for using to make these transfers!
Now everyone ever has been in a situation in which they’ve had to rub a crayon over a piece of paper that was set on some leaves or tree bark, right? Finally a use for that skill! Take your design and place it FACE DOWN on your rubber. Hold it in place firmly and rub, I use my finger nail, but Morse suggested any firm, blunt object. Make sure you rub down your whole design, you don’t want to peel up your paper and see that you’ve missed an ear or a nose in your design, assuming you’re drawing a face like I am (please don’t limit yourself!)
Now trim that sucker! You don’t want a ton of excess rubber around your design, it will be harder to clean up in the long run and might allow for little nicks and scratches to come out in your final press.
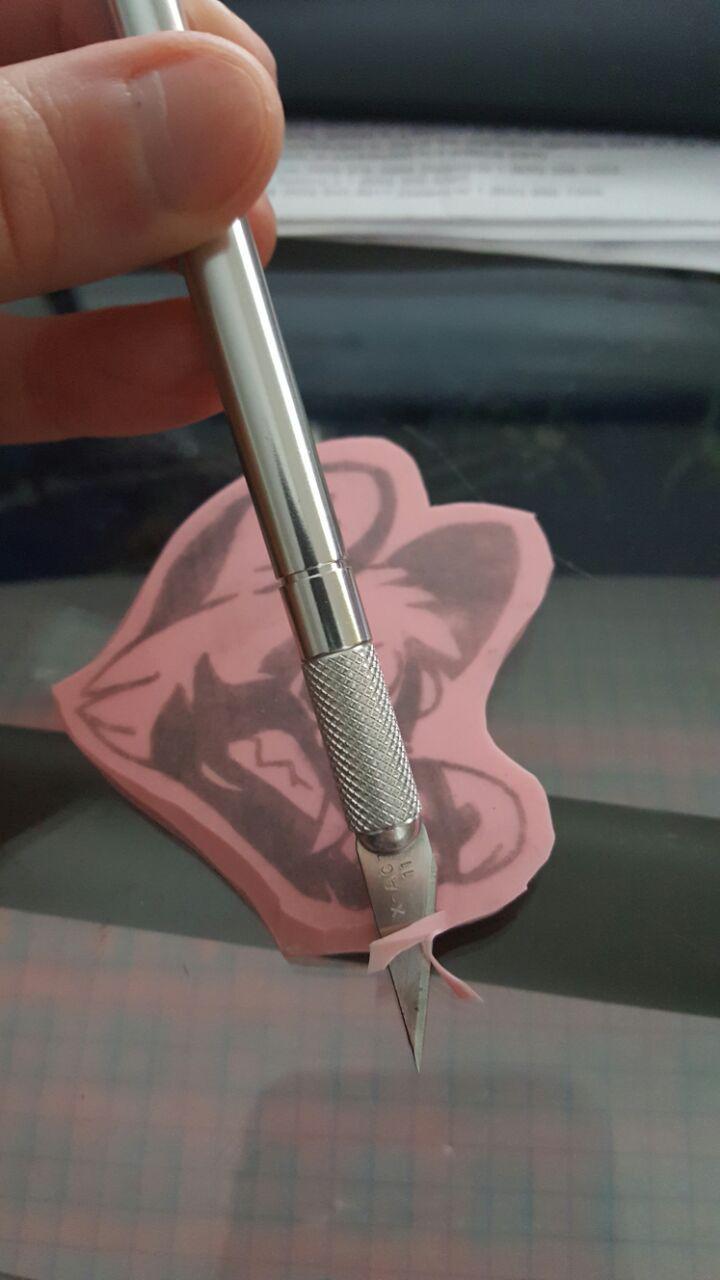
At this stage I recommend making a cut around the edge of your stamp to bevel the edge. All of this just helps to make sure you have the cleanest press (final stamp) while you work. It’s kind of like a “work smart, not hard” aspect I bring to stamp making!
REMEMBER WHEN USING AN XACTO KNIFE, ALWAYS CUT AWAY FROM YOU. You can pick up and manipulate your rubber, there’s no reason you have to make these cuts on a flat surface, especially if it helps you to get a solid grip on your stamp and make firm cuts without making your nervous or making it easier to cut yourself. Don’t be afraid to try anything, just be safe!

These are all the blades I use when I’m carving. I’ve arranged the ones that come with the Blick Lino Cutter set in order from smallest cut to largest gouge, and I do mean gouge! It helps to have a light hand at first. You don’t wanna stab the HECK out of your rubber when you’re just trying to get a slight cut or work on a tiny line. If you’re not confident in your cut or what kind of pressure to use, test it out! Get a scrap of your rubber (it’ll be the same consistency of your stamp) and try everything. There is no shame or harm in just trying it out.
If you don’t want to fork over the $$$ to buy speedball brand rubber, you can test out stamp making on your pink pearl eraser you haven’t used since high school.
This is the most messy step! Be sure to maintain and collect your little rubber shavings. They have a tendency to stick to things, like your hand if you accidentally palm your pile of shavings (me every time).

I typically use my smallest gouging/carving blade and I start with the outline. Doing this for me makes it so i can determine how think i want my interior lines to be, also i don’t get right up to that line while carving, I feel it’s “safer” to start larger and carve down as you want or need to.
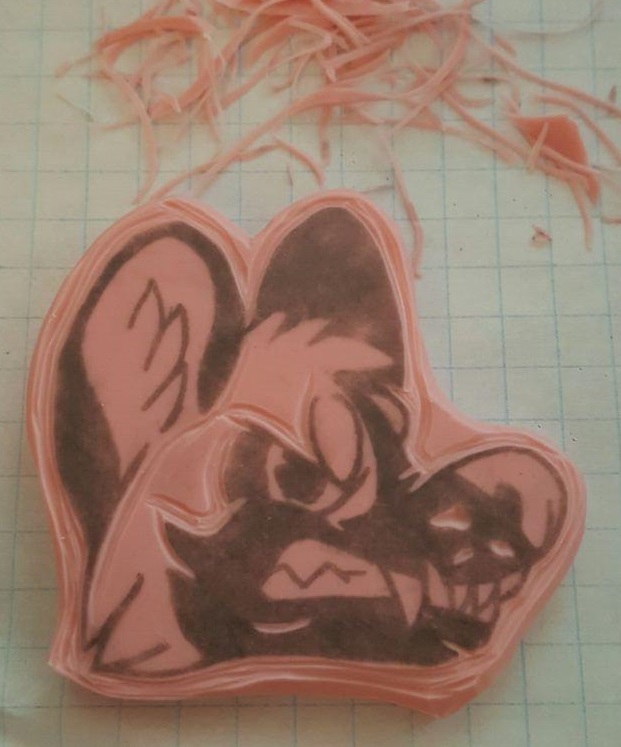
Then I go for all the interior lines. If you’ll notice the whisker spots in this photo, they aren’t very deep. I’ve found that when you carve a spot like this out of a solid ground of black, the depression doesn’t have to be very deep to still show up when you stamp, unless you overload your stamp with ink from your pad!
Depending on what kind of carving tools you have, your stamp most likely won’t have as sharp of lines as your design, so don’t fret!
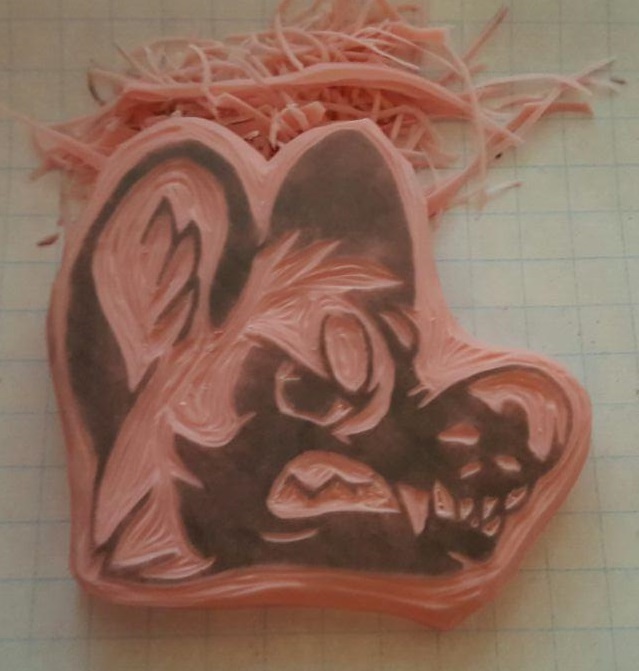
My first passes at this carve are finished! I used an xacto knife to carve out the teeth just so I could retain the sharper angles of the triangles that make them up. Notice at the top the mess of shaved portions of rubber. I carve over a piece of paper for easy clean up.
After this stage I typically rinse my freshly carved stamp under cold water to make sure all of the little scraps and particles are off before I press this to my ink pad.

After rinsing, dry off your stamp and prep a nice white paper for your press. You’ll want to be able to see what details will come out and what needs to be cleaned up easier if you use a less distracting paper. To be honest, I’m really impressed with this as a first press. Mine usually don’t turn out so clean! You can see there’s some stray marks like the one above the ear. I’ll have to go back and clean that up because I don’t want it on my final stamp.
I try to lightly cover the stamp in my pigment or ink (depends on what kind of stamper pad you have) then gently set the stamp face down on my paper. I like to use a flat firm object to do the press because I plan to mount this on a block of wood. If you don’t plan on mounting your stamp, do this step with your hand or fingers to simulate how you’ll be using your stamp in the future! It might reveal that you need to do more cleaning of stray marks on your final stamp.
Now that I have cleaned up my first pass, I stamp it again to check that I’ve cleaned up everything the way I want it.
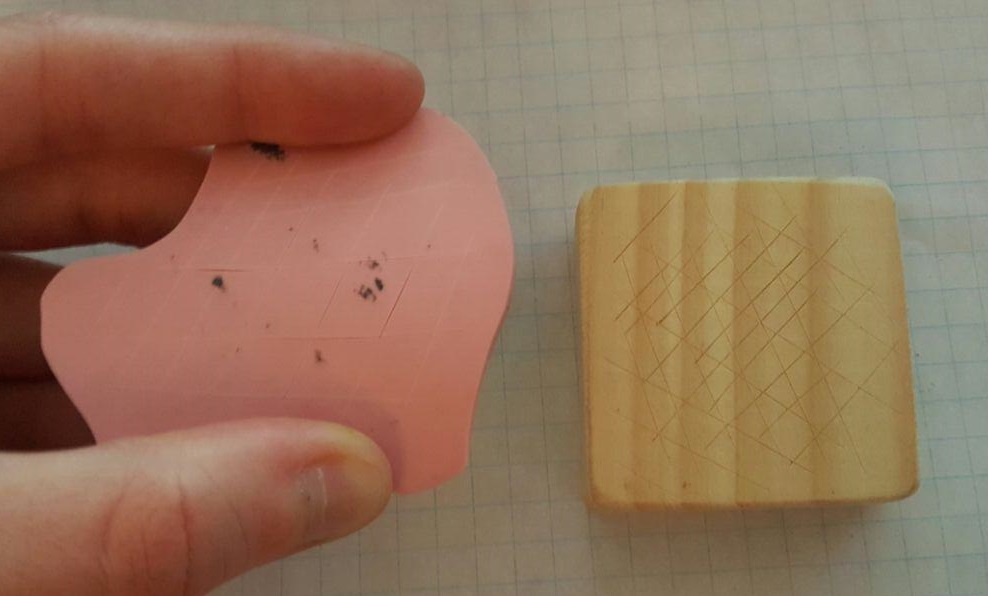
Now that the stamp is ready to mount, find an appropriately sized wooden block! All of my blocks a bit smaller than this stamp, but if you pay close attention, you can center your stamp and still have it work nicely on your block. Feel free to carefully trim the edges of the rubber around your design.
If you decide to use E6000 like I will be for mounting your block, you can follow the rest of this tutorial. If you choose to use another type of adhesive, please read the instructions! Also Use in a well ventilated area! This stuff is smelly and has fumes that might not make you feel so well, and as I said before, read the instructions on any product you’re using to mount your stamp! It might not even be appropriate for rubber, you never know!
Before applying your E6000, you’re going to want to make sure your wooden block and your stamp are free of debris, like loose grit from sanding your block, or the little scraps from your carving process. My stamp had a little gunk on it, so I did my best to scrape it off.
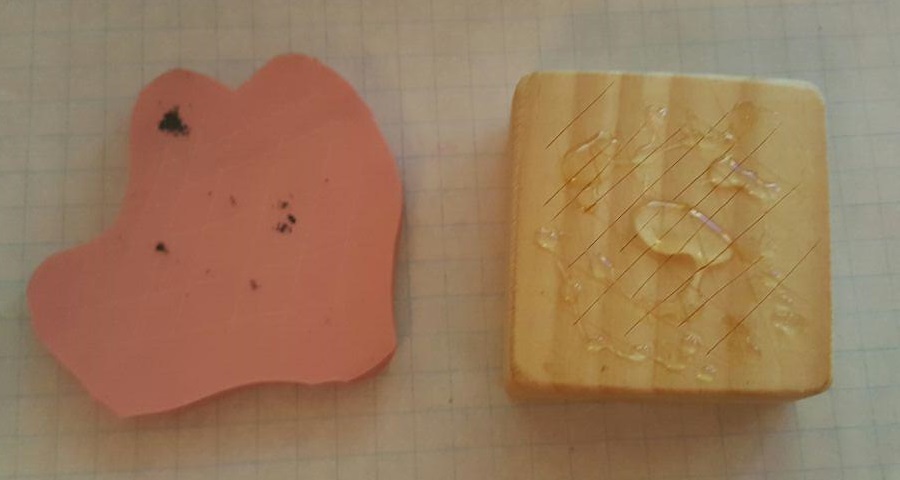
Once you’ve got your rubber and your block scored, I am under the belief the more texture the better, but don’t scrap the crap out of your rubber and be sure the cuts aren’t too deep so they don’t cute through your design, etc, place a small dab of E6000 into the center of your block. When you press your rubber and your block together, you stamp will want to shift on the block, so before your E6000 cures, you can move it around on your block to find it’s perfect fit!
How I dabble my glue on as it oozes from the tube


I flipped my block and stamp over so I could more easily tell where to distribute the weight of the block based on the border of the entire stamp since it over hangs.
After this, I just set something of medium weight on it, in this case a pint glass. You don’t want to put something too heavy on it and leave it. The pressure of the object will cause the glue to shift before it cures. I’ve done this and walked away from it only to come back to find that my stamp was about a half inch off the edge of the block, and I had to re-glue it. Luckily, E6000 peels off fairly easy if it’s only sat for 2 hours. 72 hours though, and you’d better believe your block and stamp are set for life.

And here it is! All done!
Edit: Matrices uses double sided tape to mount her stamps. She took a picture and let me use it for this tutorial!

You can find her at: https://twitter.com/RaisedbyDogs


